

Where water gets in
Every item below exists because of a failure we have dried out more than once. Water reaches a house from above (roof, gutters, downspouts), from the side (grading, window wells, the foundation wall), from below (ground water that the sump pump is supposed to lift out), and from inside (supply lines, appliance hoses, the water heater, drains). A seasonal list works because each path has a season when it is most likely to fail and a month when the fix is easy.
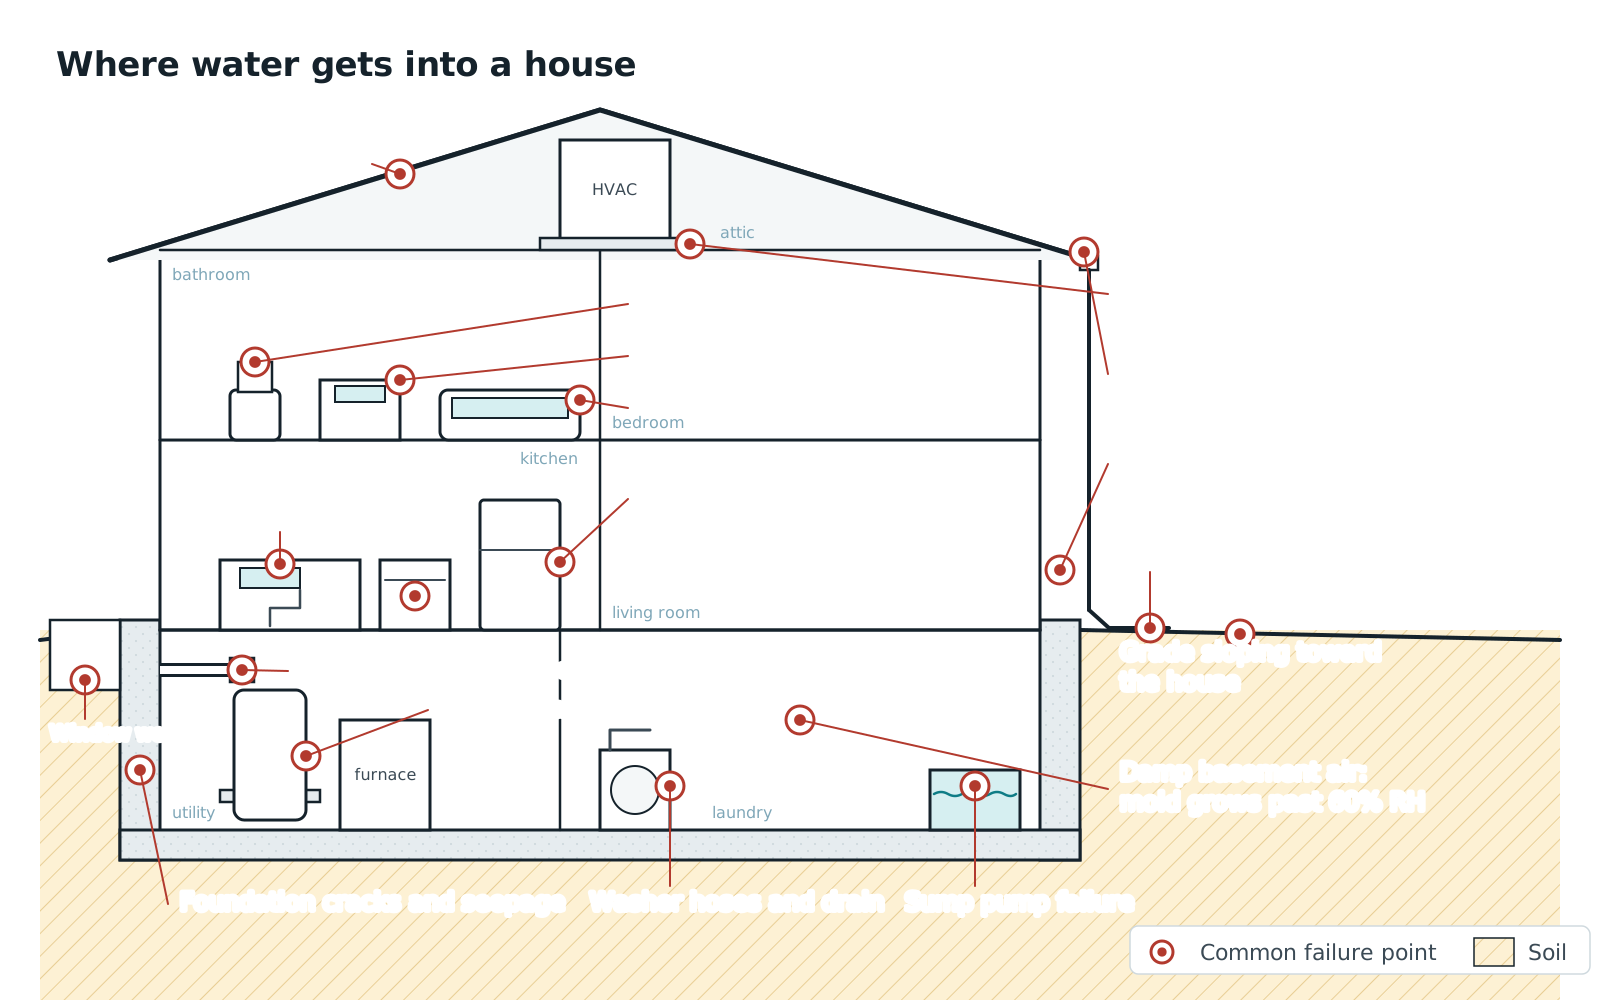
Fall: before the rain
- 1
Clear the gutters and watch the downspouts
Scoop the gutters, then run a hose into each one and watch two things: that water moves toward the downspout instead of pooling, and where the downspout dumps it. Water should land on an extension or a splash block and travel away from the foundation, not soak the soil against the wall. A downspout that discharges at the base of the house is the most common cause of a damp basement corner we see, and it is a ten-dollar fix.
- 2
Bucket-test the sump pump
Lift the lid and pour water into the pit until the float rises. The pump should start, pump the pit down, and stop without hammering or restarting. If the pit refills right after the pump stops, water is draining back through the discharge line, which means the check valve is failing; our check valve guide covers the swap. If the pump hums without moving water, or will not start at all, it is time for a new one before the rain, not after; the sump pump buying guide and the sizing calculator are the next two stops. A pump that runs all the time is its own story: what a constantly running sump pump is telling you.
- 3
Disconnect every hose and drain the bibs
A hose left attached holds water in the hose bib and in the pipe behind it. Frost-free bibs are designed to drain when the hose is off; with the hose on, they split like any other pipe, and the break is inside the wall where it runs unnoticed. Hoses off, bibs open to drain, and if the house has interior shutoffs for the bibs, close them now and leave the outside valve open.
- 4
Look at the water heater
Drain a few gallons from the valve at the bottom of the tank into a bucket to flush sediment, and look at three places: the fittings on top, the relief valve and its discharge pipe, and the pan underneath. Rust streaks or a damp pan mean a leak has already started. Note the manufacture date on the label; tanks past a decade deserve a plan. Where water heaters leak, and the first 30 minutes when one does.
- 5
Put leak sensors where water shows first
Water heater pan, behind the washing machine, in the sump pit above the high-water line, under the kitchen sink. Those four catch most of the floods that ran for days before anyone noticed. Fresh batteries in the sensors you already have, and a test of each one with a wet fingertip. The full placement map and the sensors we recommend.
Freeze week
- 1
Find the main shutoff and turn it, today
A burst supply line runs at full pressure until someone closes the main, so the freeze list starts with the valve. Find it (street side of the basement or crawl space, the garage or utility closet on a slab, the meter box at the curb in warm climates), close it once, open a faucet to prove the water stops, then reopen it. Tag it, photograph it, and show everyone who lives in the house. If the handle will not move or the water does not stop, that is a plumber call before the freeze, not during it. Every valve type, and what to do when one is stuck.
- 2
Hose bibs, again
If the hoses are still on from fall, this is the last call. Hoses off, bibs drained, the interior stop closed where one exists, insulated covers on. Covers are cheap insurance for the bibs on the north and west walls.
- 3
Pipes on exterior walls, in the crawl space and the garage
Slide insulation sleeves over exposed runs in the crawl space, the garage and any unheated space. Open the cabinet doors under sinks that sit on outside walls so room air reaches the pipes. On the coldest nights, let the faucet farthest from the main trickle; moving water is much harder to freeze, and a trickle costs less than a split pipe. If a pipe does freeze, open the faucet it feeds and warm the pipe gently with a hair dryer from the faucet back; never a torch.
- 4
Thermostat and the empty house
Never set the heat below 55°F, including when the house is empty for the holidays. A smart thermostat that alerts when the indoor temperature falls catches a dead furnace hours before the pipes do. If the house will be empty for more than a few days in freezing weather, close the main and open a faucet to drain the pressure; a house with the water off cannot flood from a supply line.
- 5
Sensors with freeze alerts, and a shutoff that closes itself
Most leak sensors also report temperature; put one near the most exposed run and set the low-temperature alert. A smart shutoff valve on the main goes further: it closes the water on abnormal flow while you are away, which turns a week-long leak into a few gallons on the floor. Moen Flo and Phyn Plus compared, and the shutoff valves we recommend.
Spring thaw
- 1
Walk the foundation
The soil should slope away from the house on every side. Fill the low spots that held snowmelt against the wall, put the downspout extensions back where the plow or the kids moved them, and reset the splash blocks. Look for new cracks in the foundation wall and for efflorescence, the white mineral bloom that means water has been moving through the concrete.
- 2
Sump pump and backup, under spring load
Thaw plus spring rain is the busiest stretch of the year for the pump. Bucket-test the primary again, listen for the check valve closing cleanly, and test the backup: a battery that sat all winter may hold almost nothing. Run the backup with the primary unplugged and time how long it keeps up. Battery backups have a service life; replace the battery on the maker's schedule, not when it fails. Installing a battery backup, the battery backups we recommend, and water-powered backups for houses on municipal water.
- 3
Window wells
Clear leaves, ice and debris from each well, then pour a bucket of water in and watch the drain at the bottom take it. A well whose drain is clogged becomes a bathtub against a basement window in the first big rain. Covers keep the debris out and stop the problem from coming back.
- 4
Restart the dehumidifier
Clean the filter and the coil, confirm the drain line runs downhill to a drain or that the condensate pump works, set the unit to hold 50 percent relative humidity or below, and start it before the humid weeks rather than after the smell arrives. The EPA's guidance is to keep indoor humidity below 60 percent and ideally between 30 and 50. The right basement humidity and how to measure it, setting up a continuous drain, and if the unit is undersized, the sizing calculator.
- 5
Check the corners and behind the boxes
A hygrometer at chest height in the middle of the room gives the number; a flashlight along the lowest corners and behind stored boxes gives the story. A musty smell with dry walls usually means the air needs drying. A tide line, damp carpet edge or soft drywall means water came in, and the question becomes where from: finding a hidden leak and the moisture meters that read through paint without a hole.
Summer and storm season
- 1
Backup power for the pit
The summer floods we get called to have one thing in common: the power went out in the storm and the pit filled while the primary pump sat silent. A battery backup pump tested under load, or a water-powered backup if the house has municipal pressure, is the fix. A portable generator helps only if someone is home, awake, and able to start it in the rain.
- 2
Primary pump, alarm and discharge line
Bucket test again, and make sure the high-water alarm actually sounds. Then go outside and follow the discharge line: it should not be crushed under a wheelbarrow, buried in mulch, or pointed back toward the foundation. A discharge line that cannot flow is the same as a dead pump.
- 3
Sensors, and the shutoff valve's automatic close
New batteries in every leak sensor. Test the smart shutoff valve's automatic close from its app so you know it still moves. Add sensors in the places that flood only in a storm: the floor of the window wells and the base of the basement stairs.
- 4
Insurance paperwork while everything is dry
Photograph every room and the mechanicals now, so that a claim later has a before. Then read the policy for two words: standard homeowner policies exclude flood (rising surface water needs a separate flood policy), and sewer or drain backup is usually an endorsement you have to add. Some insurers also discount premiums for leak detection; our table of water leak detector insurance discounts lists the programs we have confirmed. The claim checklist crews work from covers what to document when water does come in.
- 5
The 72-hour plan
Know where the main shutoff and the breaker panel are, what you would move off the floor first, and who you would call. Drying that starts inside the first day or two is a cleanup; drying that starts later is a mold job. The first 72 hours of a flooded basement, how to dry wet carpet, and when wet drywall can be dried and when it has to come out.
The whole year on one page
| Season | Outside | Inside | Equipment |
|---|---|---|---|
| Fall | Gutters cleared, downspouts extended, hoses off | Water heater flushed and inspected | Sump bucket test, leak sensor batteries |
| Freeze week | Hose bib covers, interior bib valves closed | Main shutoff found and exercised, pipes on outside walls insulated, heat never below 55°F | Freeze alerts on sensors, smart shutoff checked |
| Spring thaw | Grading fixed, window wells cleared and drained | Hygrometer reading, corners inspected | Primary and backup pump tested under load, dehumidifier cleaned and restarted |
| Summer | Discharge line clear and pointed away | Insurance photos and policy review | Backup power tested, sensors re-batteried, shutoff auto-close tested |
Print it, tape it inside the utility room door, and tick the boxes. Twenty minutes a season is less than one hour of a restoration crew's time.
Frequently asked questions
How often should I test my sump pump?
Before each wet season at minimum: fall before the rain, spring at the thaw, and early summer before storm season. The test takes two minutes: pour water into the pit until the float lifts, watch the pump empty it and stop cleanly, and make sure the pit does not refill from the discharge line. Test the battery backup at the same time by unplugging the primary and running the backup under load.
What temperature should I keep the house at to prevent frozen pipes?
Do not set the thermostat below 55°F, including when the house is empty. The pipes most at risk are the ones in unheated spaces and on exterior walls, so insulating those runs and opening cabinet doors under sinks on outside walls matters as much as the setpoint. On the coldest nights, let the faucet farthest from the main trickle. If the house will be empty in freezing weather for more than a few days, close the main and drain the lines.
Does a frost-free hose bib still need the hose disconnected?
Yes. A frost-free bib keeps its valve seat inside the warm wall and drains the exposed section when it is closed, but only if nothing is attached. With a hose on, water stays trapped in the pipe, freezes, and splits it inside the wall, where the leak shows up in the spring as a wet wall or ceiling below. Hoses off every fall, bibs drained, covers on.
What humidity should a basement be in summer?
Hold it at 50 percent relative humidity or below, measured at chest height in the middle of the room. The EPA's guidance for indoor spaces is below 60 percent and ideally between 30 and 50. Basements run more humid than upstairs because they are cooler, so a reading that is fine on the main floor can be musty below. Start the dehumidifier before the humid weeks and give it a drain line so it never shuts off on a full bucket.
Does homeowners insurance cover a flooded basement?
It depends on where the water came from. Sudden failures inside the house, such as a burst supply line or a failed water heater, are usually covered. Water that rises from outside (flooding) is excluded from standard homeowner policies and needs a separate flood policy. Water that backs up through drains or a failed sump pump is usually covered only if you added a sewer or water backup endorsement. Read your policy for those two terms before storm season, and document the house while it is dry. This is general information, not coverage advice; your agent can confirm what your policy says.
The seasonal checklist, by email
One email when the season changes — freeze week, spring thaw, hurricane season — with the checklist for that month. No weekly newsletter, no selling your address.
We send one confirmation link first. Every email has a one-click unsubscribe. Privacy.
Check your inbox for the confirmation link; the checklist follows as soon as you click it.
You are on the list. The next email arrives when the season changes.
That did not go through. Check the address and try again.
DryHomeLab is written and reviewed by the team behind HelpMeNow.com, a marketplace that connects homeowners with vetted local contractors for water-damage restoration, plumbing and waterproofing. Before HelpMeNow the same team ran a 24/7 water-damage restoration company in the Seattle area; the equipment on this site is what we specified, bought and ran on real water losses. We publish the rubric behind every score.
- Ran a 24/7 water-damage restoration company, Seattle area
- Operate HelpMeNow.com, a contractor marketplace
- Publishes its scoring rubric