

Measure before you spend anything
Two numbers tell you whether you have a problem and, later, whether you fixed it.
Relative humidity in the crawl space air. Put a hygrometer that logs or at least holds a maximum reading somewhere in the middle of the space, off the ground and away from a vent, and leave it a week. The EPA's guidance for indoor air is to keep relative humidity below 60 percent, ideally between 30 and 50; the target crews worked to under a house was 50 to 55 percent, because a crawl space is cooler than the rooms above it and the same air reads higher there. Readings that spend the summer in the 70s and 80s mean condensation on anything cooler than the air: ducts, water lines, the underside of the subfloor at the perimeter.
Moisture content of the wood. A pin moisture meter pushed into a floor joist and the subfloor at three or four places, especially near the perimeter and under bathrooms, tells you how much of that humidity the structure has absorbed. Framing in a dry crawl space reads about 8 to 14 percent. Above 16 percent it is wet for our purposes, and the USDA Forest Products Laboratory's rule of thumb is that wood above about 19 percent moisture content can support mold growth. Framing at 20 percent or more, or visible growth on the joists, moves this from a humidity job to a remediation job; see the end of this guide.
Take a flashlight down with the meter and look for the physical evidence while you are there: a water line on the piers or block, a vapor barrier that is torn, buried or missing, wet soil, efflorescence (white mineral crust) on the block, rust on duct straps and nail plates, sagging or fallen insulation, and the staining pattern under any bathroom or kitchen.
Where the moisture is coming from
A crawl space has five moisture sources, and most wet ones have more than one.
- The ground. Bare soil under a house evaporates water continuously, even soil that looks dry; a crawl space of 1,500 sq ft can put gallons a day into the air this way. This is the source a vapor retarder stops, and it is the one almost every damp crawl space has.
- Outside air through the vents. In a humid climate, summer air at 85°F and 70 percent relative humidity has a dew point around 74°F. The crawl space, cooled by the ground, sits in the 60s. Every cubic foot of that air that comes through a vent gives up water on the first surface it touches that is below 74°F: the ducts, the pipes, the framing. The vents that were supposed to dry the space are wetting it, and no dehumidifier can keep up with an open vent in July.
- Plumbing and appliance leaks. A dripping drain line under a tub, a sweating cold water line, a washing machine standpipe that overflows, a dryer vent that disconnected and blows into the crawl space, an air conditioner condensate line that drains onto the soil. Each is small, continuous and easy to miss, and the staining pattern under the fixture gives it away.
- HVAC. Leaky supply ducts push conditioned air out and pull crawl space air into the return side; sweating ducts drip; an air handler in the crawl space with a blocked condensate drain overflows its pan.
- Bulk water. Rain that runs toward the foundation because the grading is flat, downspouts that discharge at the wall, a window well or vent well that fills, a high water table in spring. Standing water or a wet perimeter after rain is this, and it is fixed outside first.
The order of operations
This is the sequence, and the reason it is a sequence is that each step makes the next one possible. Skipping to the dehumidifier is the mistake we were called back for most.
- Stop bulk water. Extend downspouts 6 ft or more from the foundation, regrade so soil falls away from the house, cover window and vent wells, fix the leaks you found with the flashlight. If water still pools after rain, the fix is a perimeter drain to a sump pit with a pump, and our sump pump roundup covers the pump. Nothing below works on a crawl space that fills.
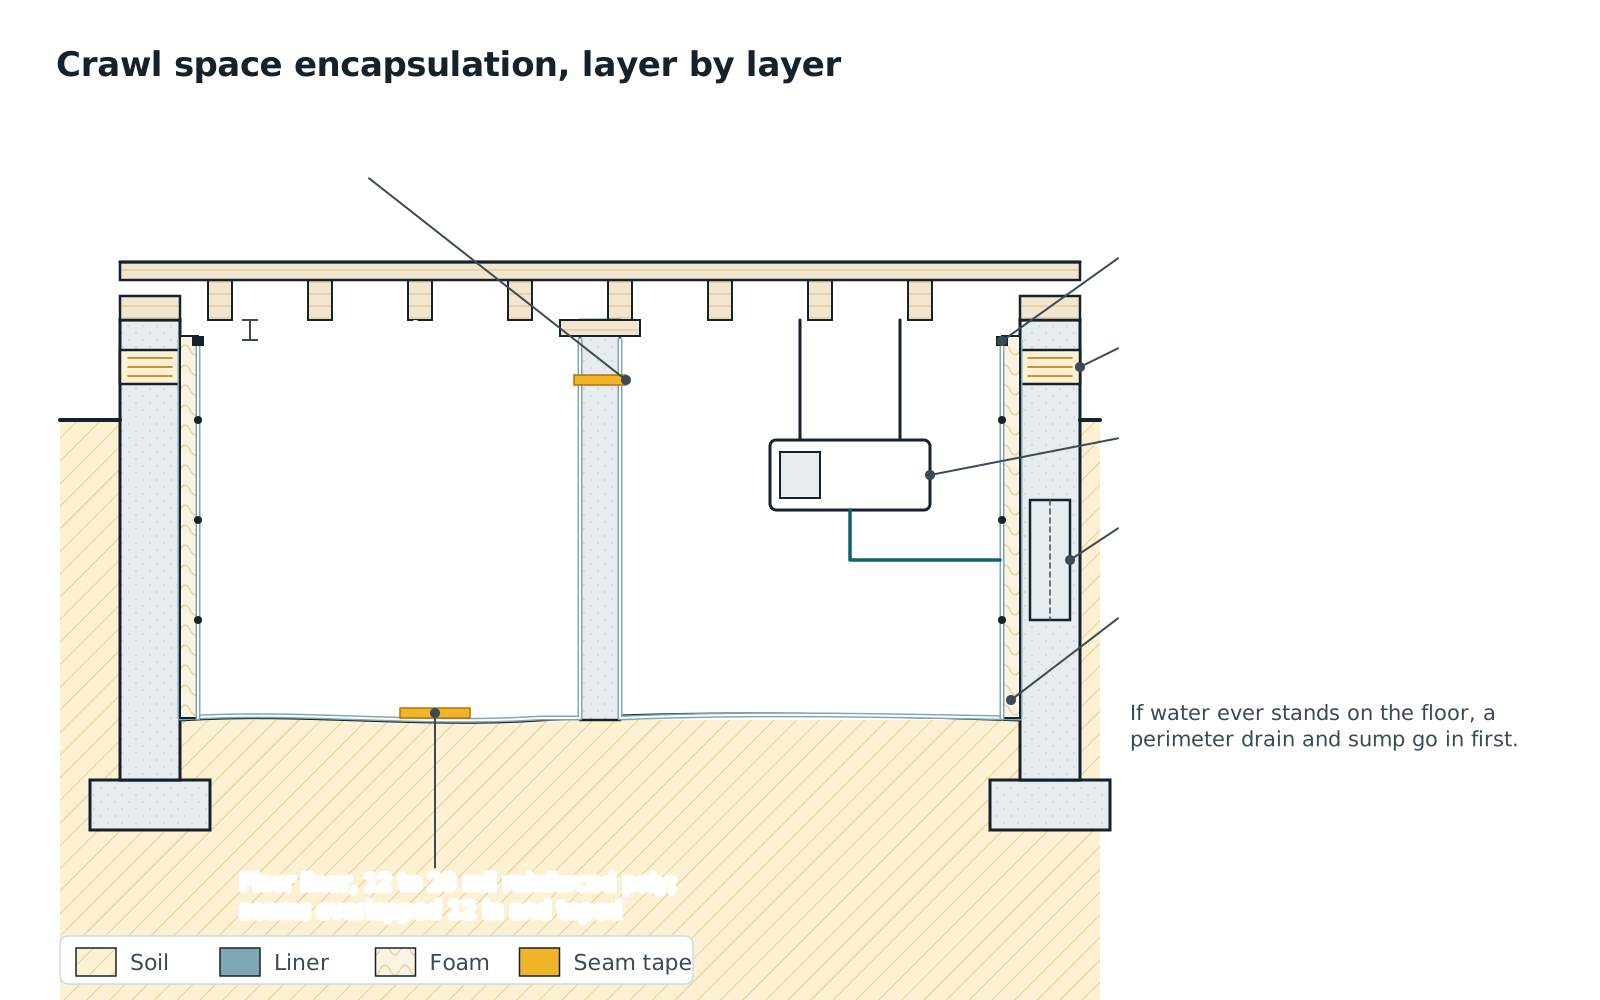
- Cover the ground. A continuous vapor retarder over every square foot of soil, seams overlapped and taped, run up the walls and sealed to them, and around every pier. This is what cuts off source one, and it is the largest single improvement on most crawl spaces.
- Close and seal the vents. Once the ground is covered, the vents are only bringing in water. Block them with rigid foam cut to fit and sealed with foam, or with the manufacturer's vent covers, from the inside.
- Air-seal and insulate the rim. The band joist between the sill and the subfloor leaks air at every joint; foam the gaps, and insulate the rim and, if you are converting to a sealed crawl space, the foundation walls.
- Dehumidify. Now a dehumidifier is working against a closed space with one remaining source, the air that leaks in, and it can win. Size it to the square footage and the climate, drain it by gravity or pump, and set it to 50 to 55 percent.
- Monitor. The hygrometer stays; a water alarm goes in the dehumidifier's pan; the framing gets metered again in a month.
The drawing shows what steps 2 through 5 look like together.
Vents: what the code actually says
The idea behind foundation vents is that outside air dries the space. In dry climates it can. In the humid half of the country it does the opposite in summer for the dew-point reason above, and in winter open vents freeze pipes. The model residential code recognizes both paths. For a vented crawl space, the International Residential Code (Section R408.1 and R408.2) requires 1 sq ft of net vent opening for every 150 sq ft of under-floor area, which can be reduced to 1 for every 1,500 sq ft when the ground is covered with a Class I vapor retarder. For an unvented crawl space (R408.3), the vents can be omitted entirely when exposed earth is covered with a continuous Class I vapor retarder whose joints overlap by 6 in and are sealed or taped, whose edges extend at least 6 in up the stem wall and are attached and sealed to it, and the space is given one of four things: continuously operated exhaust at 1 cfm per 50 sq ft of floor area, a conditioned air supply at the same rate, use as a plenum, or dehumidification sized to provide 70 pints of moisture removal per day for every 1,000 sq ft of crawl space floor area.
That last option is the one most homeowners end up with, and it gives you a sizing floor straight from the code: a 1,500 sq ft crawl space needs at least 105 pints a day of rated capacity. Your local amendments may differ, and a sealed crawl space that houses a gas furnace or water heater needs its combustion air accounted for, so check with your building department before you close the last vent.
Tools and materials
- A hygrometer that logs or holds a maximum, and a pin moisture meter for the joists; the General Tools MMD4E is enough for this
- Vapor retarder: 6-mil polyethylene is the code minimum in most places and tears the first time you crawl on it; 10- to 20-mil reinforced crawl space liner is what lasts. Buy 15 to 20 percent more than the floor area for overlaps and wall runs
- Seam tape made for the liner (not duct tape), butyl or polyurethane sealant for the wall termination, and mechanical fasteners (masonry nails with washers or a termination bar) for the wall
- Rigid foam board and spray foam for vents, rim joist gaps and penetrations; foam-compatible sealant
- A dehumidifier rated for the square footage at a sealed or moderately sealed condition, with a condensate pump if there is no drain below the unit; 3/4 in drain hose; hose hangers
- A water alarm or leak sensor for the dehumidifier pan; a GFCI-protected outlet for the unit (crawl space receptacles must be GFCI-protected under the National Electrical Code)
- Knee pads, a creeper or a sheet of plywood to slide on, a headlamp, nitrile gloves, an N95 respirator for the dust, contractor bags for the old liner and fallen insulation
- Utility knife with spare blades, tape measure, a staple gun for temporary holds
Sealing and drying a crawl space, step by step
- 1
Clean out and fix the leaks
Remove debris, old torn poly, fallen insulation and anything organic. Bag wet insulation; it does not dry under a house. Fix every leak you found: the drain fitting, the sweating line (insulate it), the dryer duct (reconnect and run it outside), the condensate line (route it out). If a bathroom drain has been leaking onto the soil for years, dig out and replace the saturated soil under it.
- 2
Handle the bulk water outside first
Downspout extensions, grading that falls 6 in over the first 10 ft, covers on wells. If the space still takes water after a storm, the perimeter drain and sump go in before the liner, because the liner will be laid over the drain's gravel. This is the step to hire out if it involves trenching under the house.
- 3
Lay the liner
Start at the far wall and work toward the hatch. Run the liner up the foundation wall 6 in at minimum (to the sill, below a termite inspection gap, if you are fully encapsulating), fasten it mechanically every 18 to 24 in, and seal the top edge with butyl. Overlap seams 6 to 12 in, lapped so water runs over and not under, and tape every seam. Cut and tape around piers, posts and the sump pit. Where the liner meets a footing drain or sump, leave the pit accessible.
- 4
Seal the vents and the rim
Cut rigid foam to fit each vent opening from inside, press it in, and foam the perimeter; or install the manufacturer's sealed vent covers. Then work the rim joist: foam every gap where the sill meets the block, where joists bear on the sill, and around every pipe, wire and duct penetration through the floor and the walls. Insulate the rim with cut foam board and foam the edges. Leave any gas appliance's combustion air supply alone until a heating contractor has confirmed what it needs in a sealed space.
- 5
Set the dehumidifier and run the drain
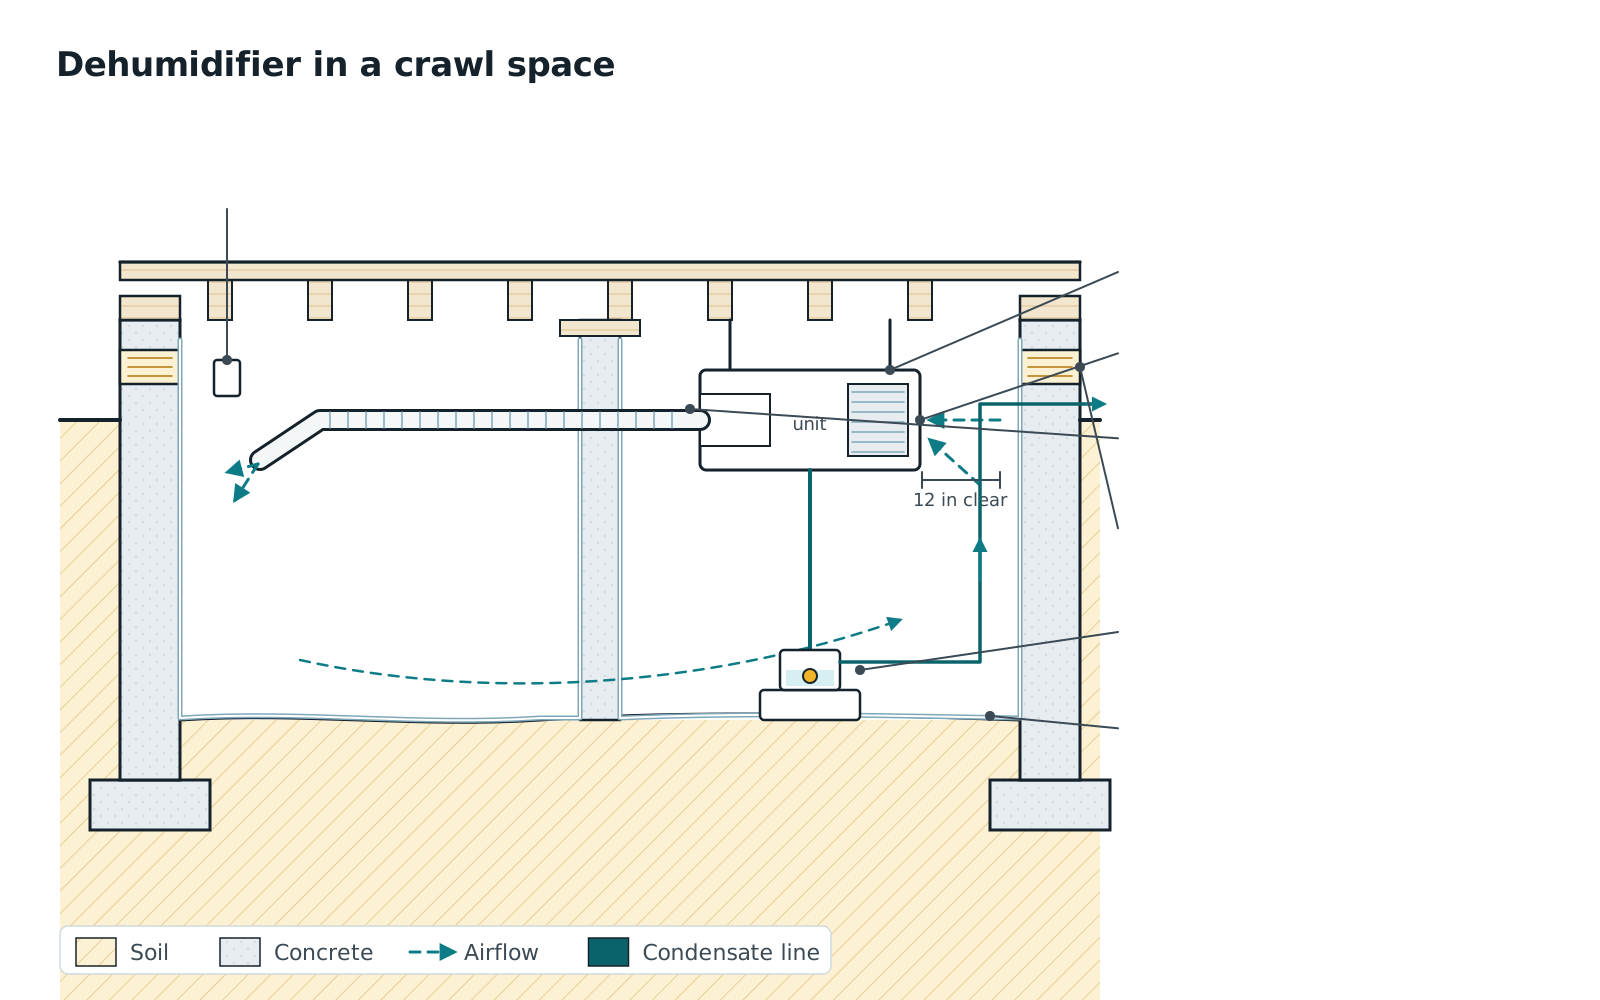
Place the unit on the liner on a paver or stand near the middle of the space, or where a duct kit can distribute dry air if the space is long or divided. Run 3/4 in hose hung from the joists with continuous fall to a floor drain, the sump pit or daylight at least 10 ft from the foundation; if nothing is below the unit, use a condensate pump and route its line up and out. Put a water alarm in the pan. Plug into a GFCI-protected outlet and set the unit to 50 to 55 percent.
- 6
Run it hard, then read the numbers
A freshly sealed crawl space works the dehumidifier continuously for two to four weeks while the soil under the liner and the framing give up stored moisture; that is normal. Check the hygrometer weekly. When it settles in the low 50s and the unit cycles, meter the joists again: under 16 percent, you are done. Still above 16 percent after a month with the air at 55 percent means a leak you did not find or a vent you did not seal.
Sizing and choosing the dehumidifier
Three things decide which unit: capacity for the square footage and how well sealed the space is, performance in cold air, and whether it physically fits through the hatch and under the joists.
Capacity. Crawl space and whole-home units are rated in pints per day at the AHAM condition of 80°F and 60 percent humidity, not the cooler DOE condition retail portables use, so compare like with like. Manufacturers publish coverage by how tight the space is: Santa Fe rates the Compact70 for up to 2,600 sq ft tightly sealed, 2,200 moderately sealed and 1,800 loosely sealed, which is a useful reminder that sealing is worth more square footage than the next model up. The code's 70 pints per 1,000 sq ft is the floor for an unvented space; the calculator below adds headroom for a cool space and air leakage.
Cold performance. Crawl spaces sit in the 40s and 50s for much of the year across most of the country, and a refrigerant dehumidifier's output falls as the air cools until it reaches a floor where the coil ices and the unit cycles off. Santa Fe and AprilAire publish minimums of 49 and 50°F; AlorAir's Sentinel line publishes 33.8°F with automatic defrost. In a sealed crawl space under a heated house the temperature usually holds above 50°F; in a partially sealed one in a cold climate it does not, and the AlorAir floor is the difference between a unit that works in March and one that waits for May.
Fit. Measure the hatch and the lowest clearance on the way to where the unit will sit, and subtract 3 in for the liner, a stand and the drain fitting. The Compact70 is 12 in tall; the Sentinel HD55 is 13.3; the AprilAire E080 is 15; the Sentinel HDi90 is 17.7. The crawl space roundup compares all six we have documented, and the Santa Fe versus AprilAire comparison covers the two ducted favorites.
What size dehumidifier do you need?
Enter the space. We size by the current DOE pint rating (the number on the box since 2019), with the headroom restoration crews build in.
- Minimum removal needed: about 18 pints/day; with 25% headroom, 22 pints/day.
- Estimated running cost: roughly $28/month in season at ~550 W. ENERGY STAR units cut this 10–15%.
- Route the drain hose to a floor drain or condensate pump so it never stops to empty a bucket.
- Santa Fe Compact70Score 7.8 · 70 pt/day · 2600 sq ftCheck price
- AlorAir Sentinel HDi90Score 7.7 · 90 pt/day · 2600 sq ftCheck price
- AlorAir Sentinel HD55Score 6.4 · 53 pt/day · 1200 sq ftCheck price
- Paid links.
Santa Fe Compact70
The 12-inch-tall unit that fits where nothing else in this class does.
Best for sealed crawl spaces up to about 2,200 sq ft with under 18 in. of clearance and a gravity drain.
Score breakdown
| Right-sized moisture removal | 70 | 10.0 |
| Efficiency | 2.6 | 6.7 |
| Cold crawl space performance | 49 | 7.3 |
| Warranty | 6 | 10.0 |
| Fits a low crawl space | 12 | 10.0 |
| Quietness | 55 | 6.7 |
| Coverage | 2600 | 8.0 |
| Condensate pump included | false | 0.0 |
| Ductable | true | 10.0 |
| Airflow | 150 | 2.5 |
Stars are DryHomeLab's rating from the published rubric (score ÷ 2, to the half star). Not a customer rating.
- 12 in. tall and 55 lb: fits through a standard hatch and under low joists
- MERV-13 filter standard; most competitors ship MERV-1 or MERV-8
- 6-year warranty on the current (4044110) version
- Rotatable exhaust and optional duct kit for divided crawl spaces
- 49°F minimum operating temperature; cycles off in cold vented crawl spaces
- Condensate pump and duct kit are extra-cost accessories
- Onboard controls only; no remote or wall control listed
- 150 CFM is the lowest airflow of the full-size units here
The Compact70 is the unit we find already installed in more crawl spaces than any other, and the reason is the cabinet: 12 in. wide, 12 in. tall, 21 in. deep, 55 lb. It slides through a 16-by-24 access hatch and sits on a vapor barrier where an 18- or 19-inch-tall box will not. Santa Fe rates it at 70 pints per day at 80°F/60% RH and 2.6 L/kWh, with 150 CFM of airflow and a MERV-13 filter in front of the coil. The current version (part 4044110) carries a 6-year warranty.
Where it falls short: the published minimum operating temperature is 49°F, so in a cold, vented crawl space it will spend late fall through early spring cycling off. (Seal the space first; the roundup explains why.) Santa Fe also publishes the efficiency drop in cool air, 2.6 L/kWh at 80°F falling to 1.96 L/kWh at 65°F, which is the honest number to budget on in a crawl space. There is no condensate pump in the box; Santa Fe's pump kit (up to 12 ft of lift) is a separate purchase, as is the duct kit. Controls are on the unit, which matters when the unit is 40 ft from the hatch, so budget for a remote hygrometer so you are not crawling in to read the display.
Buy it for a sealed or encapsulated crawl space up to roughly 2,200 sq ft (Santa Fe says 2,600 sq ft if tightly sealed, 1,800 sq ft if loose), where height is the constraint and you can gravity-drain. If the space is larger, divided by footings, or you need a pump and remote control included, look at the AlorAir Sentinel HDi90 or the AprilAire E080.
Customer reviews: read them on Amazon (paid link). We link to them and never copy or score them.
AlorAir Sentinel HDi90
Pump in the box and a 33.8°F operating floor, for less than the US-built units.
Best for cold or partially sealed crawl spaces and unfinished basements with 20 in. or more of clearance that need a pump.
Score breakdown
| Right-sized moisture removal | 90 | 10.0 |
| Efficiency | 2.69 | 7.4 |
| Cold crawl space performance | 33.8 | 10.0 |
| Warranty | 6 | 10.0 |
| Fits a low crawl space | 17.7 | 4.3 |
| Quietness | 58 | 4.7 |
| Coverage | 2600 | 8.0 |
| Condensate pump included | true | 10.0 |
| Ductable | false | 0.0 |
| Airflow | 210 | 5.5 |
Stars are DryHomeLab's rating from the published rubric (score ÷ 2, to the half star). Not a customer rating.
- Condensate pump included; the only unit of the six that ships with one
- 33.8°F minimum operating temperature with automatic defrost
- 90 pints/day at AHAM, 210 CFM, 2.69 L/kWh
- 6-year limited warranty, first 2 years full coverage
- 17.7 in. tall and 70.5 lb; too tall for low crawl spaces
- MERV-1 filter standard; MERV-8 is an add-on
- This SKU is not ductable and the remote is sold separately
- Under 58 dBA: the loudest published figure in the group
The Sentinel HDi90 is the value play in this class and the only one of our six that ships with a condensate pump in the box. AlorAir's current spec sheet (September 2025) rates it at 90 pints per day at AHAM conditions (the 198-pint figure in the product name is at saturation; ignore it for sizing), 2.69 L/kWh, 210 CFM, coverage up to 2,600 sq ft, and a 33.8°F to 104°F operating range with automatic defrost. That low-temperature figure is the headline: tied with its sibling the HD55, it is 15°F below the Santa Fe and AprilAire minimums, and it is why we steer cold, partially sealed crawl spaces toward it.
The cabinet is the cost. At 23.2 by 15.2 by 17.7 in. and 70.5 lb it is the tallest unit here apart from the Ultra98, which rules out tight crawl spaces. The standard filter is MERV-1 (a MERV-8 is optional), the remote control is sold separately, and this SKU is not ductable; AlorAir sells a separate duct-able HDi90 for that. Sound is listed under 58 dBA, the highest published figure in the group. The warranty is 6 years limited, with full coverage for the first 2 years, and AlorAir does not state where the unit is built.
Buy it for an encapsulated crawl space or unfinished basement with 20 in. or more of clearance, when you need a pump included and want the best cold-weather spec for the money. Skip it if you need to duct it (buy the duct-able version instead) or if clearance is under 18 in., where the Compact70 is the answer.
Customer reviews: read them on Amazon (paid link). We link to them and never copy or score them.
AlorAir Sentinel HD55
The light, low, basic unit for a small sealed crawl space on a budget.
Best for sealed crawl spaces and utility basements under about 1,200 sq ft with a downhill drain path.
Score breakdown
| Right-sized moisture removal | 53 | 5.8 |
| Efficiency | 2.27 | 3.9 |
| Cold crawl space performance | 33.8 | 10.0 |
| Warranty | 6 | 10.0 |
| Fits a low crawl space | 13.3 | 8.7 |
| Quietness | 50 | 10.0 |
| Coverage | 1200 | 1.0 |
| Condensate pump included | false | 0.0 |
| Ductable | false | 0.0 |
| Airflow | 120 | 1.0 |
Stars are DryHomeLab's rating from the published rubric (score ÷ 2, to the half star). Not a customer rating.
- 13.3 in. tall and 41.7 lb; easy to get through a hatch and across a vapor barrier
- 33.8°F minimum operating temperature with automatic defrost
- 6-year limited warranty
- Under 50 dBA
- 53 pints/day at AHAM covers only about 1,200 sq ft
- 2.27 L/kWh is the lowest efficiency of the six
- Gravity drain only; no pump, no duct option, remote sold separately
- MERV-1 filter; amperage not published
The Sentinel HD55 is the small-crawl-space unit: AlorAir rates it at 53 pints per day at AHAM conditions (113 at saturation), 2.27 L/kWh, 120 CFM, and up to 1,200 sq ft, in a 19.2 by 12.2 by 13.3 in. cabinet that weighs 41.7 lb. That is the second-lowest profile in this group after the Compact70, and the lightest by 13 lb, which matters when you are dragging it 30 ft across a vapor barrier on your stomach. Like the HDi90 it runs down to 33.8°F with automatic defrost, and it carries AlorAir's 6-year limited warranty.
It is a basic machine. Gravity drain only (no pump), a MERV-1 filter, onboard controls with the remote sold separately, no duct option, and the lowest efficiency of the six at 2.27 L/kWh against 2.6 to 2.9 for the Santa Fe and AprilAire units, which adds up over a season of continuous running. AlorAir does not publish amperage on the product page. Mind the model spread: the HD55S is the ENERGY STAR-listed variant and the HD55P adds a pump; the plain HD55 is what we spec here. Sound is listed under 50 dBA.
Buy it for a sealed crawl space or utility basement under about 1,200 sq ft where you can run a drain line downhill and the budget does not stretch to a Compact70. For anything larger or wetter, the extra capacity and the pump of the HDi90 are worth the difference.
Customer reviews: read them on Amazon (paid link). We link to them and never copy or score them.
Doing it yourself versus hiring an encapsulation contractor
Everything above is physically possible for a homeowner with a weekend, a creeper and a tolerance for crawling. What a contractor adds is a heavier liner installed faster, the drainage work (trenching a perimeter drain under a house is miserable), wall insulation done to code, and a warranty on the result. What they sometimes add that you do not need is a sales pitch: an encapsulation quote that leads with mold, radon or structural fear deserves a second quote. The parts of the job most worth hiring out are the sump and drain, any insulation of foundation walls in a cold climate, and anything involving the gas appliances. The parts most worth doing yourself are the leak repairs, the cleanout, the liner on a simple rectangular crawl space, and the dehumidifier.
Three cautions apply either way. A sealed crawl space with a gas furnace or water heater in it changes the combustion air supply; have a heating contractor confirm the appliance is direct-vented or has a dedicated air supply. Sealing can change how radon moves into the house; test before and after. And in termite regions, pest control companies and some jurisdictions want an inspection gap of bare wall left between the top of the liner and the sill, so do not run the liner to the wood without asking.
When it is mold remediation, not moisture control
If the joists and subfloor show growth, the question changes. The EPA's mold guidance is that a homeowner can clean an area under about 10 square feet with detergent and water, an N95 respirator, gloves and goggles; a crawl space with growth on the framing is almost always larger than that, is overhead, and is in a confined space, which is professional work under the IICRC S520 mold remediation standard: containment, HEPA filtration, removal of the growth from the wood, and verification afterward. The humidity fix is still required, because remediation without moisture control grows back, but it comes after or alongside the remediation, not instead of it.
When to call a pro
Call a waterproofing or crawl space contractor if the space takes standing water after rain, if a perimeter drain or sump is needed, if the foundation walls need insulating to code, or if the crawl space is too low to work in. Call a heating contractor before sealing a crawl space with a gas appliance in it. Call a mold remediation contractor if the framing shows growth over more than a small patch, or reads over 20 percent moisture content with staining. Call a plumber for a drain leak you cannot reach. The form below reaches vetted local contractors through HelpMeNow.com.
Frequently asked questions
What humidity should a crawl space be?
Aim for 50 to 55 percent relative humidity, and keep it below 60. The EPA's guidance for indoor air is below 60 percent and ideally 30 to 50; a crawl space is cooler than the house above it, so the same air reads higher there and the low 50s is the practical target. The wood is the second check: floor joists and subfloor should read under 16 percent on a pin moisture meter. Framing above about 19 percent moisture content can support mold growth, according to the USDA Forest Products Laboratory.
Will a dehumidifier alone fix a humid crawl space?
Not if the vents are open or the ground is bare. A dehumidifier works against a closed space with a limited source; against open vents in a humid summer and gallons a day evaporating from the soil, it runs continuously and loses. Cover the ground with a sealed vapor retarder, close and seal the vents, fix any leaks and bulk water, and then a correctly sized dehumidifier holds the space at 50 to 55 percent without running all day.
Should crawl space vents be open or closed?
In humid climates, closed and sealed, with a vapor retarder on the ground and a dehumidifier or conditioned air supply, which is the unvented crawl space path the International Residential Code allows in Section R408.3. Open vents in summer bring in air whose dew point is above the temperature of the ducts and framing, so it condenses; in winter they freeze pipes. In dry climates open vents can work. Check your local code, and account for combustion air if a gas appliance is in the space.
What size dehumidifier do I need for a crawl space?
The International Residential Code's unvented crawl space provision sizes dehumidification at 70 pints per day for every 1,000 sq ft of floor area, rated at the AHAM condition, so a 1,500 sq ft crawl space needs at least about 105 pints a day; that assumes a sealed space with a vapor retarder. Manufacturers publish coverage by how tight the space is (Santa Fe rates the Compact70 at 2,600 sq ft tightly sealed and 1,800 loosely sealed). Use the calculator above, and favor a unit rated for cold air if the space runs below 50°F.
How thick should a crawl space vapor barrier be?
The code requires a Class I vapor retarder, which 6-mil polyethylene satisfies, with seams overlapped 6 in and sealed or taped and the edges run at least 6 in up the stem wall and sealed to it. Six-mil poly meets the letter of the requirement and tears the first time someone crawls on it to service the furnace. A 10- to 20-mil reinforced liner costs more per square foot and lasts the life of the house, which is why encapsulation contractors use it.
How long does it take for a crawl space to dry out after sealing it?
Expect the dehumidifier to run continuously for two to four weeks while the soil under the liner and the framing give up the moisture they have stored, then settle into cycling as the air holds in the low 50s. The framing takes longer than the air: joists that started at 20 percent moisture content typically take a month or two to fall below 16. If the air is at 55 percent and the wood is still above 16 percent after two months, there is a leak or an opening you have not found.
The seasonal checklist, by email
One email when the season changes — freeze week, spring thaw, hurricane season — with the checklist for that month. No weekly newsletter, no selling your address.
We send one confirmation link first. Every email has a one-click unsubscribe. Privacy.
Check your inbox for the confirmation link; the checklist follows as soon as you click it.
You are on the list. The next email arrives when the season changes.
That did not go through. Check the address and try again.
DryHomeLab is written and reviewed by the team behind HelpMeNow.com, a marketplace that connects homeowners with vetted local contractors for water-damage restoration, plumbing and waterproofing. Before HelpMeNow the same team ran a 24/7 water-damage restoration company in the Seattle area; the equipment on this site is what we specified, bought and ran on real water losses. We publish the rubric behind every score.
- Ran a 24/7 water-damage restoration company, Seattle area
- Operate HelpMeNow.com, a contractor marketplace
- Publishes its scoring rubric