

Why a pump that worked last spring can fail tonight
A sump pump spends most of its life doing nothing, and that is when the failures set up: silt settles around the intake and the float, iron bacteria glue the switch to the pit wall, the flapper in the check valve stiffens open, and the discharge outlet outside fills with leaves or freezes. None of it makes a sound. The pump looks fine from the top of the pit right up to the first night it has to run for six hours straight.
When we opened pits on flooded-basement calls, the pump itself was rarely the first thing that had failed. Far more often it was the switch, the check valve, a tripped outlet or a crushed discharge line, and every one of those would have shown up in a five-minute test the weekend before. The manuals agree: Zoeller's installation instructions say to inspect and test the system at least every three months, and Wayne's say to inspect three to four times a year and to pour a bucket of water into the pit to confirm the pump starts. Our schedule is tighter, because we have seen what a missed quarter costs: five minutes every month, a longer look each spring and fall, and a test before any storm in the forecast.
What you are testing
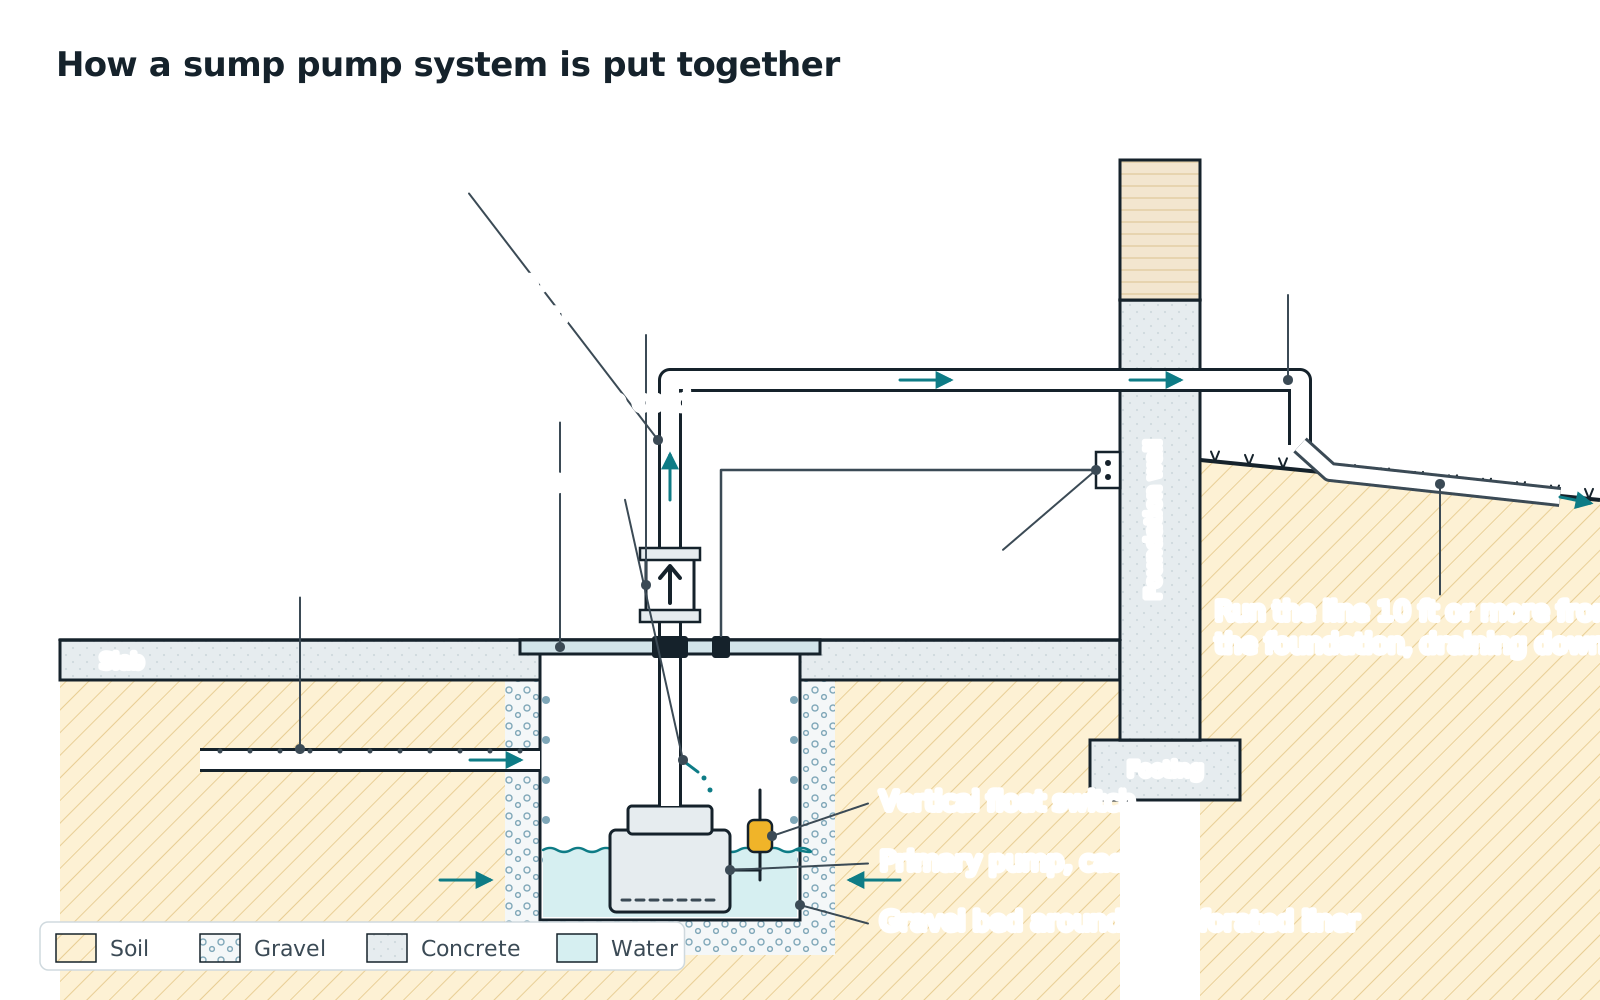
A sump system is five parts, and water meets them in this order: the pit and the drain tile that feeds it, the pump, the switch that starts it, the check valve on the riser that keeps pumped water from falling back, and the discharge line that carries water outside and away. The test walks the same path. Water goes in, the switch should notice, the pump should move it, the valve should hold it, and it should come out of the pipe in the yard. If a link breaks, you want to know which one; a stuck float and a seized motor have very different fixes.
Tools and materials
You need almost nothing, which is the point: the test should be easy enough that you actually do it.
- A garden hose that reaches the pit, or a 5-gallon bucket (an 18-in. pit rises only about an inch per gallon, so a hose is easier)
- A flashlight or headlamp
- Nitrile gloves; sump water is not clean
- A phone to time the pump-down and photograph the pit
- A stiff wire for the weep hole
- Optional: a cup of water for the high-water alarm probe, painter's tape and a marker for the log

The monthly five-minute test
- 1
Lift the lid and look before you pour
Shine the light in. You are looking for the water level (normal is below the turn-on point and above the intake), anything floating that could snag the switch, silt against the float, oil sheen on the water (the motor seal is leaking), and the condition of the cord. Check that the pump sits level on a hard surface and the cord is tied to the riser clear of the float.
- 2
Fill the pit until the pump starts
Run the hose in, or pour slowly, and watch the float. A vertical float rides up a rod beside the pump; a tethered float swings up on its cord. The pump should start as the float nears the top of its travel; the Zoeller M53 turns on at about 7-1/4 in. of water and the Wayne CDU980E at 9 in., so one bucket will not always get there. Note the level when it starts. If the float is at the top and nothing happens, stop filling and go to the next step.
- 3
If it does not start, test the switch and the outlet
Unplug the pump. Most use a piggyback plug: the switch plugs into the wall and the pump into the back of the switch. Plug the pump straight into the outlet. If it runs, the switch is dead and the pump is fine; a piggyback switch is a cheap part. If nothing runs, press TEST and RESET on the GFCI, check the breaker, and plug a lamp into the outlet. A tripped GFCI was the most common reason we found a dead pump in a dry pit. Only if the outlet is live and the pump is silent is the motor the problem.
- 4
Watch it pump down and time it
Time it from start to stop; most residential pits empty in 10 to 30 seconds. A steady hum with moving water is right. A hum with no water moving means a jammed impeller or an air lock; grinding or rattling means debris in the volute or a bearing on its way out. Confirm the pump shuts off on its own before the intake is exposed. If it runs dry for several seconds each cycle, the off point is set too low.
- 5
Listen for the check valve
The moment the pump stops, the water in the riser falls back onto the valve. You should hear one clunk, and the level in the pit should stay put. A gurgle that lasts several seconds while the level climbs means the valve is not holding and the pump lifts the same water twice every cycle. A hard bang every time means it is seating late, usually a worn flapper or a valve mounted too high. Both are a 30-minute fix; see our check valve guide.
- 6
Check the weep hole
Above the pump and below the check valve there should be a small hole, about 3/16 in., angled down into the pit. Zoeller's instructions call it a vent hole, require it below the check valve and the basin cover, and say to clean it periodically; it lets trapped air out so the pump cannot air-lock, and it clogs with iron sludge. While the pump runs you should see a small jet squirt from it. No jet, clear it with a wire. No hole, drill one the next time the pump is out.
- 7
Go outside and watch the discharge
Run the pump again and have someone watch the outlet, or go out and look for the wet trail. Water should leave in a strong stream and run away from the house, not pool against the foundation or into a window well. Make sure the pipe end is not buried in mulch, crushed by the mower or, in winter, packed with snow. A discharge that ends 2 ft from the wall puts every gallon back into the drain tile, which is why some pumps run forever on a dry day.
- 8
Test the alarm and the backup, then log it
If there is a high-water alarm, touch its probe with a wet finger or dip it in a cup of water and confirm it sounds and your phone gets the alert. If there is a battery backup, test it as described below. Then write the date, the turn-on level and the pump-down time on tape on the riser or in a note on your phone. A pump that took 15 seconds in March and 40 in October is telling you something before it fails.
Testing the battery backup
Most current controllers run a weekly self-test, which proves the circuit works. It does not prove the pump can lift water through its own check valve or that the float is set where it should be. Once a month, after the primary test:
- Unplug the primary. Leave the backup's charger plugged in.
- Fill the pit past the primary's turn-on level. Nothing should happen yet; the backup's float belongs 2 to 3 in. higher. If the backup starts at the same level as the primary, it has been running on every cycle and wearing out its battery; reset the float height.
- Keep filling until the backup starts. It should pump the pit down, the controller should alarm, and a Wi-Fi unit should alert your phone. Water should not run back down its own riser when it stops; the backup needs its own check valve.
- Plug the primary back in, silence the alarm, and confirm the charger returns to charging within a few minutes.
- Look at the battery. Check the install date on the case; deep-cycle batteries last three to five years whether or not they ever run a storm. Terminals clean and tight. Wet-cell batteries get distilled water with the charger off; AGM has nothing to open. A bulging case or a fault light means it is done.
For a water-powered backup, lift its float by hand with the primary unplugged. The supply valve should open, the ejector should pull water from the pit and the water meter should spin. Check that the backflow preventer is in place and dry. These units use roughly a gallon of city water for every two they pump, so keep the test short.
If there is no backup, the monthly test is the time to think about it. A primary that passes every test still stops when the power does, and the storms that fill pits take lines down. Our battery backup roundup and install guide cover the choice and the afternoon's work.
The seasonal checks
The monthly test catches the pump. The slower failures live outside the pit.
Spring. Walk the discharge from the rim joist to its end: sagging runs that hold water, pulled joints, a buried line you cannot see the end of (run the pump and find where water surfaces). Clear the outlet. Inside, confirm the lid seals and the drain tile inlets into the pit are flowing, not silted shut.
Fall. Same walk, plus freeze protection: slope along the whole discharge so water cannot sit and freeze, a freeze-relief fitting near the rim joist so the pump has somewhere to push water if the line beyond it ices over, and an outlet the plow or the roof slide will not bury. Run the backup through two pit-downs in a row with the primary unplugged; replace its battery if it is in its fourth year.
Once a year, clean the pit. Unplug, pump down, lift the pump out onto cardboard. Scoop and wet-vac the silt, rinse the intake screen and float, clear the weep hole, turn the impeller by hand with the power off, set it back level, and run the full test. Wayne's manual says to replace a tethered switch every two years; the same logic applies to any switch that hesitated during a monthly test.
A schedule you can put on the calendar
| When | What | Time |
|---|---|---|
| Monthly, and before a forecast storm | Fill-and-watch test: float, pump-down time, check valve, weep hole, discharge outside, alarm, backup with the primary unplugged | 5 min |
| Spring | Walk the discharge line, clear the outlet, confirm the lid seals, check drain tile inlets | 20 min |
| Fall | Discharge slope and freeze protection, backup runtime test, snow plan for the outlet | 30 min |
| Yearly | Pull and clean the pump and pit, turn the impeller by hand, clear the weep hole, inspect the cord | 45 min |
| Every 2 years | Replace a tethered float switch (Wayne's interval) or any switch that hesitated | 15 min |
| Every 3 to 5 years | Replace the backup battery regardless of how it tests | 15 min |
| At 7 to 10 years | Plan the pump's replacement before it picks the date | See the guide |
Zoeller's instructions call for a system test at least every three months and Wayne's for three to four inspections a year; monthly is cheap insurance under a finished basement.
What a failed test looks like, and what it means
Float at the top, nothing happens. Switch, outlet or motor, in that order. Bypass the piggyback switch, test the GFCI, then suspect the pump. A tethered float wedged against the pit wall is a stuck switch, not a dead pump; reposition it and shorten the tether.
Hums but moves no water. Unplug it. The impeller is jammed with grit, or the pump has air-locked because the weep hole is clogged or missing. Clear the hole; if that is not it, pull the pump and turn the impeller by hand.
Pumps, stops, and the pit refills in seconds. The check valve is not holding. Replace it; until you do, the pump does two or three times the work it should.
Will not shut off. The float is hung up or the switch contacts have welded. Unplug it before you reach in. If the float moves freely and it still runs, replace the switch; if the level never drops while it runs, read the running constantly guide, because the problem may be the discharge.
Slow. A pump-down that took 15 seconds and now takes 45 is a worn impeller, a blocked intake, a bellied discharge full of silt or a check valve that only half opens. Clean first, then compare.
Trips the breaker or GFCI. Once could be the outlet. Twice is water in the motor or a failing winding; replace the pump before the next storm rather than reset it again.
Oil on the water, rust streaks from the seal. The motor seal has gone and water is next.
Any pump that fails a test and is more than seven or eight years old is cheaper to replace than to coax along. Our replacement guide walks the swap and the sump pump roundup has the pumps we would put in. The M53 below is the one we found most often still running in pits older than its warranty.
Zoeller M53 Mighty-Mate
The pump plumbers install in their own basements.
Best for most homes with a standard 18-inch pit and under 12 ft of lift.
Score breakdown
| Build material | cast iron | 10.0 |
| Switch reliability | vertical float | 9.0 |
| Right-sized flow at 10 ft of head | 2040 | 10.0 |
| Warranty | 3 | 5.0 |
| Head capability | 19.25 | 6.0 |
| Efficiency (lower amps) | 9.7 | 2.9 |
| Cord length | 9 | 1.6 |
| Solids handling | 0.5 | 10.0 |
| Thermal protection | true | 10.0 |
| Editorial adjustment | Field durability: on the sump failures our crews responded to, Zoeller's cast iron M-series pumps were the ones most often found still running past year ten; the paper warranty understates the service life we saw. | +1.0 |
Stars are DryHomeLab's rating from the published rubric (score ÷ 2, to the half star). Not a customer rating.
- Cast iron switch case, motor housing and base shed heat into the water
- Slow 1,550 RPM motor runs cool and quiet
- Vortex impeller passes 1/2-inch solids without clogging
- Auto-reset thermal overload protects a pump that runs dry
- 9-ft cord is short for deep pits; longer-cord versions cost more
- 9.7 A draw is high for the flow it delivers
- Flow falls off steeply above 15 ft of lift
- 3-year warranty trails Wayne's 5 years
The M53 is the pump we find most often when we open a pit on a water loss in an older home, and usually it is still running. It is a 3/10 HP, 1,550 RPM cast iron submersible with a non-clogging vortex impeller that passes 1/2-inch solids, an integral float switch, and an auto-reset thermal overload. Zoeller rates it at 43 GPM (2,580 GPH) at zero head and 2,040 GPH at 10 ft, with a 19.25-ft shutoff.
Where it shines is longevity, not peak numbers. Cast iron on the switch case, motor housing and base dumps motor heat into the water, and the slow 1,550 RPM shaded-pole motor runs cool and quiet. On a typical basement lift of 8–12 ft it moves plenty of water for a normal pit fed by 4-inch drain tile.
Where it falls short: the 9-ft cord is short for a deep pit, the 9.7 A draw is high for a 3/10 HP motor, and once your lift gets near 15 ft the curve drops hard. If your inflow test on our sizing calculator shows more than about 30 GPM at 10 ft, step up to the M98 or a 3/4 HP Wayne.
Buy it if you have a standard 18-inch pit, under 12 ft of lift, and want the pump most plumbers install in their own basements. The 3-year warranty is shorter than Wayne's five, but field survival is the better number.
Customer reviews: read them on Amazon (paid link). We link to them and never copy or score them.
Basement Watchdog Special CONNECT
The affordable backup that still moves real water.
Best for budget backup protection where outages are short and infrequent.
Score breakdown
| Runtime | 48 | 8.2 |
| Flow at 10 ft of head | 1850 | 8.5 |
| Charger strength | 1.6 | 1.3 |
| Audible alarm | true | 10.0 |
| App alerts built in | false | 0.0 |
| Automatic self-test | true | 10.0 |
| Warranty | 2 | 5.0 |
Stars are DryHomeLab's rating from the published rubric (score ÷ 2, to the half star). Not a customer rating.
- 1,850 GPH at 10 ft at a low price
- 48 hours intermittent on one Group 27 battery, 96 on two
- Weekly self-test and audible alarm
- Accepts the BW-WiFi2 module and a security-panel dry contact
- 1.6 A charger is slow to recover after a long outage
- Does not alert on backup pump failure or show battery percentage
- Battery and Wi-Fi module sold separately
- 2-year base warranty
The Special CONNECT (model BWSP) is the backup we see most often in the field, because it is cheap enough that plumbers add it without a conversation. The 12 V pump is rated 2,600 GPH at zero head and 1,850 GPH at 10 ft, with a 16-ft maximum head and an 18 A draw at 10 ft. Watchdog rates runtime at 48 hours on one BW-27AGM battery at a 10% duty cycle and 96 hours with two, and because it draws less current than the Big Dog, it runs longer on the same battery.
The controller tests the pump weekly, sounds an alarm that can be silenced for 24 hours, and warns of pump activation, a discharged or worn-out battery, a loose cable, or a power or fuse problem. A remote terminal connects to a security panel, and newer units (serial 375000 and up) accept the BW-WiFi2 module for text, email and push alerts.
Where it falls short: the charger is a 1.6 A unit, so a deeply discharged Group 27 battery takes a day or more to recover. The controller does not alert if the backup pump itself fails and does not show battery percentage. The battery is not included, and the base warranty is 2 years (4 with the Watchdog AGM battery and registration).
Buy it if outages at your house are short and rare and you want a real backup rather than nothing. If storms come in clusters, the Big Dog's 20 A charger is worth the step up.
When to call a pro
Call a plumber or basement waterproofer if the pump trips the breaker more than once, if the pit holds water above the turn-on level while the pump runs (the discharge may be blocked or frozen underground), if the discharge line is buried and you cannot find where it comes out, if the outlet or the electrical panel sits where a pit overflow would reach, or if the pit is a hole in the slab with no liner and no lid. A plumber replaces a pump in an hour or two; a waterproofer handles the pit, drain tile and discharge problems a new pump cannot fix. If water has already come over the rim onto a finished floor, the first 24 to 48 hours decide whether it is a cleanup or a mold job, and our 72-hour guide is where to start. The form below reaches vetted local plumbers and waterproofers through HelpMeNow.com.
Frequently asked questions
How often should you test a sump pump?
Monthly, plus before any storm in the forecast. Zoeller's installation instructions say to inspect and test the system at least every three months and Wayne's manual says three to four inspections a year, so quarterly is the manufacturers' floor. A monthly fill-and-watch test takes five minutes and catches a stuck float, a failed check valve or a tripped outlet weeks before a storm does. Add a look at the discharge line each spring and fall and a pit cleaning once a year.
How do you test a sump pump with a bucket?
Pour water into the pit slowly until the float lifts and the pump starts, then watch it pump down and shut off. An 18-in. pit rises only about an inch per gallon and most pumps turn on at 7 to 9 in. of water, so you may need two buckets or a hose. While it runs, check for a jet from the weep hole, listen for the check valve to close with one clunk when it stops, and go outside to confirm water leaves the discharge and runs away from the house.
Is lifting the float enough to test a sump pump?
No. Lifting the float proves the switch and motor work for a second. It does not show whether the float rises on its own, whether the pump moves water, whether the check valve holds or whether the discharge is open, and most of the failures that flood basements are in those parts. Fill the pit so the whole system has to work; lift the float only as a quick check between full tests.
What are the signs a sump pump is failing?
A pump-down that takes noticeably longer than it used to, a hum with no water moving, grinding or rattling, water rushing back into the pit after each cycle, a float that hesitates, a breaker or GFCI that trips more than once, oil sheen on the water, rust streaks from the seal, and a pump that runs without lowering the level. Any of these on a pump past seven or eight years old is a reason to replace it rather than repair it.
How do you test a battery backup sump pump?
Unplug the primary and fill the pit with a hose. The backup should start only after the water passes the primary's turn-on level by 2 to 3 in., pump the pit down and sound its alarm. Confirm water does not run back down its own riser when it stops, plug the primary back in and check that the charger returns to charging. The weekly self-test checks the circuit, not the float setting or the check valve, so do the manual test monthly, and replace the battery at three to five years regardless.
Why does my sump pump trip the GFCI?
Once can be a nuisance trip from moisture at the outlet. Repeated trips usually mean water has reached the motor windings or the cord is damaged, and the pump should be replaced rather than reset again. Do not move it to a non-GFCI outlet or an extension cord. Current electrical codes require GFCI protection on basement receptacles, so the durable fix is a sound pump on its own circuit plus a power-loss or high-water alarm so a trip never goes unnoticed.
The seasonal checklist, by email
One email when the season changes — freeze week, spring thaw, hurricane season — with the checklist for that month. No weekly newsletter, no selling your address.
We send one confirmation link first. Every email has a one-click unsubscribe. Privacy.
Check your inbox for the confirmation link; the checklist follows as soon as you click it.
You are on the list. The next email arrives when the season changes.
That did not go through. Check the address and try again.
DryHomeLab is written and reviewed by the team behind HelpMeNow.com, a marketplace that connects homeowners with vetted local contractors for water-damage restoration, plumbing and waterproofing. Before HelpMeNow the same team ran a 24/7 water-damage restoration company in the Seattle area; the equipment on this site is what we specified, bought and ran on real water losses. We publish the rubric behind every score.
- Ran a 24/7 water-damage restoration company, Seattle area
- Operate HelpMeNow.com, a contractor marketplace
- Publishes its scoring rubric