

Where the water comes from
A basement gets wet from three sources, and they are not equally likely. Roof water is first: an average roof sheds hundreds of gallons in an inch of rain, and a gutter that overflows or a downspout that ends at the foundation puts all of it in the soil against the wall. Surface water is second: a lot that slopes toward the house, a patio or driveway pitched the wrong way, a window well that fills like a bucket. Ground water is last: a seasonal water table that rises to the footing and pushes in at the floor-wall joint no matter what you do above grade.
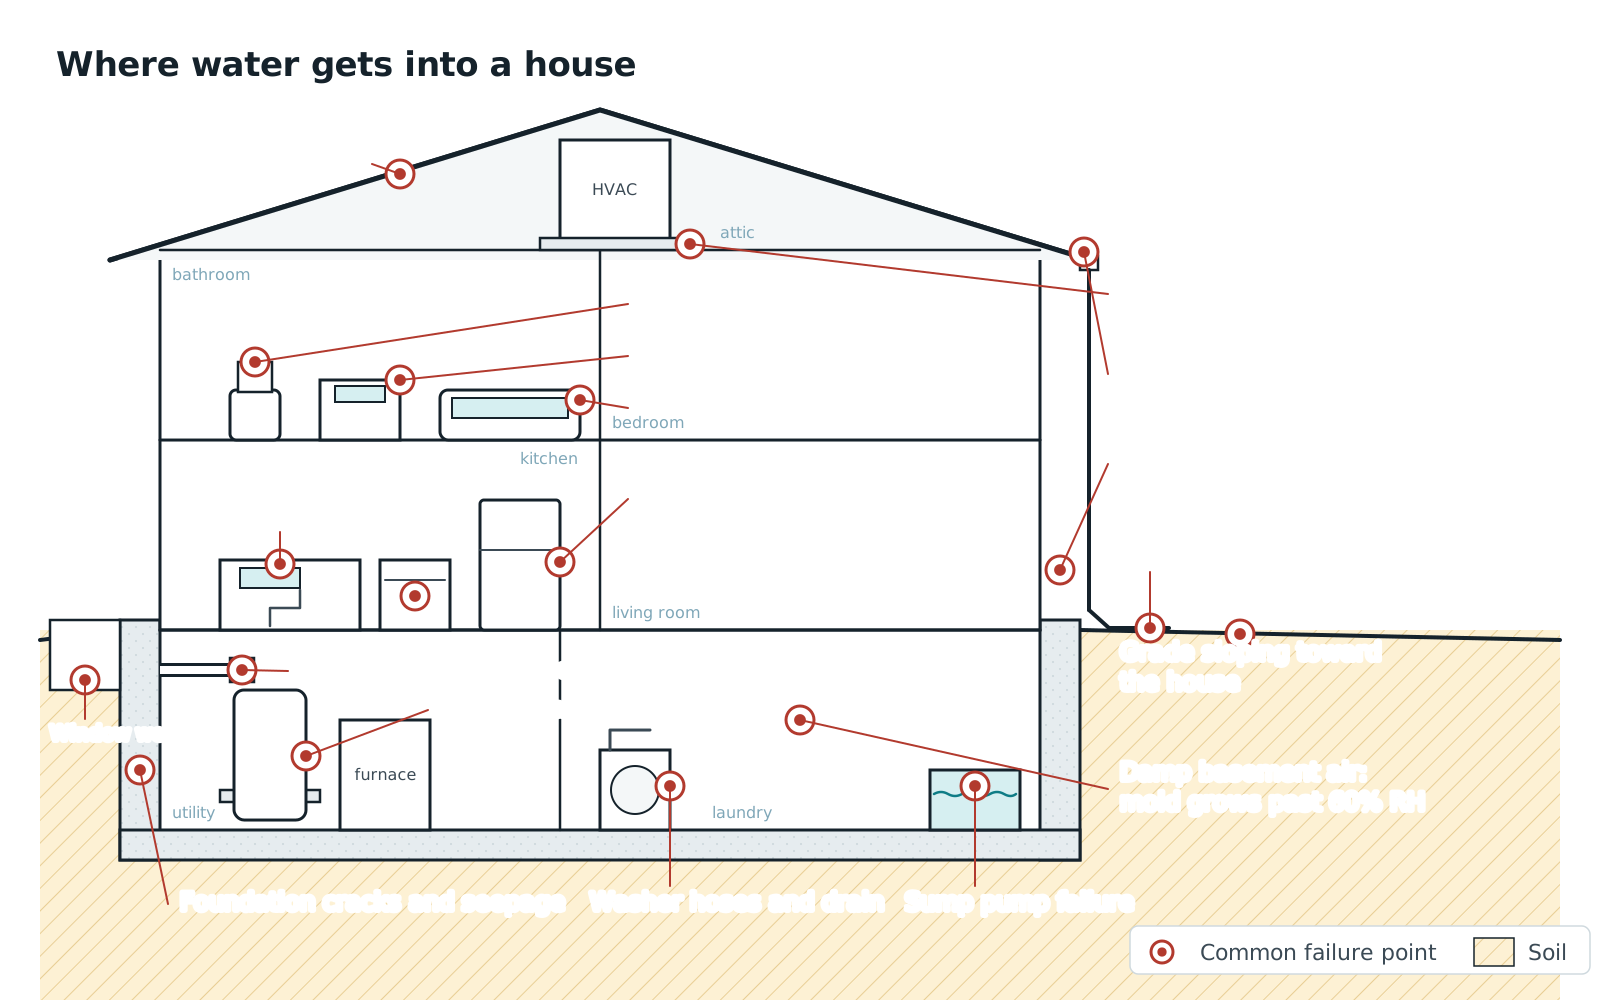
The order matters because the fixes for the first two are cheap and the fix for the third is not, and because a drain tile system installed under a basement that is really a gutter problem will run its pump all spring and still leave the wall damp. Walk the outside first. The diagram shows where to look.
Tools and materials
- A 10-ft straight board or a string line, a 4-ft level, and a tape measure for the grading check
- A garden hose for testing gutters and window well drains, or a rainy afternoon
- Ladder, gloves, a gutter scoop and a bucket
- Downspout extensions (rigid or hinged, 6 ft or longer), splash blocks, and if needed 4-in. solid drain pipe for a buried line to daylight
- Clean fill or topsoil with some clay for regrading; never bark mulch against the wall
- Window well covers, washed gravel and a drain grate
- A notepad or your phone for a sketch of the house with every downspout, well and wet spot marked
- Indoors: painter's tape and a 2-ft square of plastic or aluminum foil for the condensation test, a flashlight and a hygrometer

The outside walk-around, with the numbers
- 1
Watch the gutters in a hard rain
Nothing replaces standing outside with an umbrella. Look for water sheeting over the front edge (clogged or undersized), spilling at the end caps and corners (pitch is wrong or the outlet is blocked), and dripping behind the gutter (no drip edge or a pulled-away gutter). Clean them, then run the hose: water should move to the downspout without pooling, which takes at least 1/16 in. of fall per foot of gutter, the pitch the Department of Energy's Building America guidance uses. Count the downspouts: a long run with one outlet overflows at the far end, and adding a second downspout is cheaper than any interior fix. Check that the downspouts are not crushed or disconnected at the elbow.
- 2
Follow every downspout to where the water actually goes
A downspout that ends at the foundation, on a splash block tilted toward the house, or into a buried pipe nobody has seen the end of is the single most common cause of the wet basements we dried. Every downspout should discharge at least 6 ft from the foundation, 10 ft where the lot allows, onto ground that slopes away. Hinged extensions fold up for mowing; a buried 4-in. solid line to daylight or a dry well is the permanent version. If a downspout feeds an underground pipe, run the hose into it for five minutes and confirm water comes out somewhere; if it backs up, the line is broken or clogged and is pouring roof water straight into the soil at the wall.
- 3
Measure the grade
Lay the 10-ft board from the foundation outward with the level on it and lift the far end until it reads level; the gap under the far end is your fall. The building code's rule for new construction (IRC R401.3) is at least 6 in. of fall in the first 10 ft, and where walls or lot lines prevent that, swales or drains to carry the water away; paved surfaces within 10 ft should slope at least 2 percent, about 2-1/2 in. in 10 ft. Check every side, and pay attention to the spots where soil settled after construction: at the corners, over the utility trenches and beside the porch. Soil that slopes toward the house, even gently, holds water against the wall after every rain.
- 4
Check how high the soil sits on the wall
While you are at it, look at where grade meets the house. The code wants the top of the foundation at least 6 in. above finished grade (4 in. with masonry veneer), and wood siding, trim and sheathing should stay 6 in. or more off the soil. Mulch, flower beds and decades of topsoil creep upward; soil touching siding wicks water into the wall and hides termites. Regrading means adding soil at the wall and feathering it out, never burying siding to get the slope.
- 5
Look into every window well
A window well without a drain is a bucket, and the window at the bottom is not watertight. Each well should have a cover that sheds rain and leaves (egress wells need covers that open from inside without tools, per IRC R310.4), a bed of washed gravel at the bottom, and a drain, either a vertical pipe down to the footing drain tile, which the code requires for egress wells (R310.2.3.2) except on well-drained soils, or at minimum a gravel column that reaches the footing. Egress wells themselves must be at least 9 sq ft with a 36-in. projection (R310.2.3), which is a lot of catchment. Test with the hose: a well that holds water for more than a few minutes has no working drain. Check that the well's liner is sealed to the wall and sits above grade.
- 6
Check the paved surfaces and the other discharges
A patio, stoop or driveway slab that has settled toward the house is a chute. Put the level on them; anything pitched toward the wall needs mudjacking, a cut-in drain or a replacement. Then find the other water sources people forget: the air conditioner's condensate drain, the sump discharge outlet (it should not be 2 ft from the wall feeding the drain tile it came from), a hose bib that drips into a low spot, and a neighbor's downspout or yard that drains onto yours. Sketch all of it.
- 7
Read the basement for what the outside missed
Inside, the location of the water tells you its source. A stain or damp band on the wall at or just below grade level, worst under a downspout or a window well, is surface water. Water at the floor-wall joint, the cove, after days of rain or at the spring thaw is ground water pushing up around the footing. A single crack that weeps is a crack. White crust (efflorescence) marks where water has moved through the masonry and evaporated. To separate seepage from condensation, tape a 2-ft square of plastic or foil to the wall with all edges sealed and check it after two days: wet on the room side is condensation and a dehumidifier problem; wet on the wall side is water coming through.
Sealers and crack repair: what they can and cannot do
Once the outside is fixed, most basements are dry. For the ones that still show water, the interior options go from cheap to expensive, and the cheap ones have limits worth knowing before you buy.
Masonry waterproofing paint (the cementitious or elastomeric coatings sold in 5-gallon buckets) bonds to bare, clean concrete or block and resists moisture coming through the pores of the wall. It is a reasonable finish for a damp-feeling wall after the exterior is fixed. It cannot be applied over existing paint or efflorescence and hold, it cannot bridge a moving crack, and it cannot stop water that arrives at the floor-wall joint, because that water comes up under the slab rather than through the wall. If the pressure behind the wall is high enough, it will push the coating off in blisters; that is the wall telling you the problem is outside or below.
Hydraulic cement sets fast and hard, even against running water, and is the right patch for a tie-rod hole, a pipe penetration or a spalled spot. It is rigid, so on a crack that moves with the seasons it will separate within a year or two.
Crack injection is the real repair for a leaking crack in a poured concrete wall. Low-pressure polyurethane foam injected from the inside follows the crack through the full thickness of the wall and stays flexible; epoxy injection is used when the crack also needs structural bonding. Homeowner kits exist and work on simple vertical cracks if you prep the surface and follow the instructions; a waterproofer does it in an hour with a warranty. Injection does not work on block walls, whose hollow cores carry water sideways, and it does not fix a crack that is still opening, which is a structural question for an engineer.
Sealing from outside means digging to the crack, cleaning it, applying a membrane patch and backfilling with gravel against the wall. It is more work and the better fix where the crack is reachable.
None of these address the cove joint. If water comes in where the floor meets the wall, you are in the next section.
Interior drain tile and a sump: when it is the right answer
An interior drainage system is a trench cut around the perimeter of the slab, a perforated pipe in gravel laid beside the footing, a dimpled membrane on the lower wall that directs weeping water into the trench, and a sump pit with a pump that lifts it out. It does one thing well: it relieves the hydrostatic pressure that pushes ground water up at the cove and through the lower wall, by giving the water an easier path. It is the right answer when the outside is fixed and the basement still takes water at the floor-wall joint in wet seasons, when the water table is simply high, or when a finished basement cannot tolerate even an occasional damp cove.
It is the wrong first move when the wet spots are under downspouts, when the walls are wet at grade line rather than at the floor, or when nobody has checked the window wells. It also does not keep water out of the wall above the membrane, so a block wall that weeps at mid-height stays damp.
If you go this way, the pump is the whole system. Specify a cast iron primary sized to the pit's inflow with our sizing calculator, a sealed lid, a check valve and union, a discharge to daylight well away from the house, and a battery backup, because the storm that fills the trench is the storm that takes the power out. Our sump pump roundup and battery backup roundup cover the hardware; the two below are what we would specify, and the cost guide covers what the pit and pump add to the bill.
Zoeller M53 Mighty-Mate
The pump plumbers install in their own basements.
Best for most homes with a standard 18-inch pit and under 12 ft of lift.
Score breakdown
| Build material | cast iron | 10.0 |
| Switch reliability | vertical float | 9.0 |
| Right-sized flow at 10 ft of head | 2040 | 10.0 |
| Warranty | 3 | 5.0 |
| Head capability | 19.25 | 6.0 |
| Efficiency (lower amps) | 9.7 | 2.9 |
| Cord length | 9 | 1.6 |
| Solids handling | 0.5 | 10.0 |
| Thermal protection | true | 10.0 |
| Editorial adjustment | Field durability: on the sump failures our crews responded to, Zoeller's cast iron M-series pumps were the ones most often found still running past year ten; the paper warranty understates the service life we saw. | +1.0 |
Stars are DryHomeLab's rating from the published rubric (score ÷ 2, to the half star). Not a customer rating.
- Cast iron switch case, motor housing and base shed heat into the water
- Slow 1,550 RPM motor runs cool and quiet
- Vortex impeller passes 1/2-inch solids without clogging
- Auto-reset thermal overload protects a pump that runs dry
- 9-ft cord is short for deep pits; longer-cord versions cost more
- 9.7 A draw is high for the flow it delivers
- Flow falls off steeply above 15 ft of lift
- 3-year warranty trails Wayne's 5 years
The M53 is the pump we find most often when we open a pit on a water loss in an older home, and usually it is still running. It is a 3/10 HP, 1,550 RPM cast iron submersible with a non-clogging vortex impeller that passes 1/2-inch solids, an integral float switch, and an auto-reset thermal overload. Zoeller rates it at 43 GPM (2,580 GPH) at zero head and 2,040 GPH at 10 ft, with a 19.25-ft shutoff.
Where it shines is longevity, not peak numbers. Cast iron on the switch case, motor housing and base dumps motor heat into the water, and the slow 1,550 RPM shaded-pole motor runs cool and quiet. On a typical basement lift of 8–12 ft it moves plenty of water for a normal pit fed by 4-inch drain tile.
Where it falls short: the 9-ft cord is short for a deep pit, the 9.7 A draw is high for a 3/10 HP motor, and once your lift gets near 15 ft the curve drops hard. If your inflow test on our sizing calculator shows more than about 30 GPM at 10 ft, step up to the M98 or a 3/4 HP Wayne.
Buy it if you have a standard 18-inch pit, under 12 ft of lift, and want the pump most plumbers install in their own basements. The 3-year warranty is shorter than Wayne's five, but field survival is the better number.
Customer reviews: read them on Amazon (paid link). We link to them and never copy or score them.
Basement Watchdog Big Dog CONNECT
The strongest charger and the most water of the dedicated backups.
Best for finished basements with a primary pump that runs often.
Score breakdown
| Runtime | 40 | 6.4 |
| Flow at 10 ft of head | 2200 | 10.0 |
| Charger strength | 20 | 10.0 |
| Audible alarm | true | 10.0 |
| App alerts built in | false | 0.0 |
| Automatic self-test | true | 10.0 |
| Warranty | 2 | 5.0 |
Stars are DryHomeLab's rating from the published rubric (score ÷ 2, to the half star). Not a customer rating.
- 2,200 GPH at 10 ft, the most of the dedicated backups we checked
- 20 A multistage charger recovers the battery between storms
- Weekly automatic self-test and battery-percent display
- Dual-float switch with dual reed switches
- Dry-contact terminal for a security system
- Battery sold separately
- Wi-Fi alerts require the BW-WiFi2 module, sold separately
- 2-year base warranty unless you buy the Watchdog battery and register
- Draws 20 A at 10 ft, so runtime depends on battery capacity
The Big Dog CONNECT is Basement Watchdog's heavy backup: a 12 V pump rated 3,500 GPH at zero head and 2,200 GPH at 10 ft, with a 16-ft maximum head and a 20 A draw at 10 ft. That is enough to keep up with most primary pumps' real-world duty, not just trickle water out while you wait for the utility.
The part most people overlook is the charger. The Big Dog ships with a 20 A multistage smart charger, more than ten times the 1.6 A unit in the Special. After a long outage a 20 A charger refills a Group 27 battery in hours rather than days, which matters when storms come in pairs. Watchdog rates runtime at 40 hours on one BW-27AGM battery at a 10% duty cycle, 80 hours with two, and the controller runs a weekly self-test, sounds an alarm you can silence for 24 hours, shows battery charge percentage, and flags a loose cable, a discharged battery, a failed pump, or a blown fuse. The switch is a dual-float with dual micro-reed switches.
Where it falls short: the battery is not included, Wi-Fi alerts need the BW-WiFi2 module sold separately, and the base warranty is 2 years (buying with a Watchdog AGM battery adds one year and registering within 60 days adds another, for 4). Pit size is not published; plan on an 18-inch basin if you are adding this beside a primary.
Buy it if your basement is finished and the primary pump cycles hard in spring. Add the Wi-Fi module.
Exterior waterproofing: when it is worth the excavation
The exterior system is what the house should have had when it was built: dig to the footing, clean the wall, apply a waterproof membrane (not the thin dampproofing spray most houses got), protect it with a dimple board or drainage mat, lay a new perforated footing drain in washed gravel wrapped in filter fabric, and backfill with free-draining material. It stops water from entering the wall at all rather than catching it inside, which is why it is the answer for block walls that weep across their face, for walls with many cracks or failing parging, for any wall with structural movement that an engineer wants addressed from outside, and for the stretch of wall that is going to be exposed anyway for a porch, addition or sewer repair. It is the most expensive option by a wide margin, it destroys landscaping, and it is often impossible on a zero-lot-line side. Most houses do not need it; the ones that do usually know it.
Then, and only then, the dehumidifier
A basement that no longer takes water is often still humid, because the slab and walls are cool and summer air condenses on them. That is a dehumidifier problem and a small one: a 50-pint unit set to 50 percent relative humidity, drained to the floor drain or the sump, holds most basements in the EPA's recommended 30 to 50 percent range. Run it before the water is fixed and it will run forever, pulling moisture out of the wall as fast as the soil supplies it. Our basement humidity guide covers the target and the measurement, and the basement dehumidifier roundup the units.
The checklist by season
| When | Outside | Inside |
|---|---|---|
| Spring (after the thaw, before the rains) | Clean gutters, re-attach extensions, test buried downspout lines with the hose, check window well drains, look for soil that settled over winter | Walk the walls with a flashlight after the first heavy rain; note new stains, efflorescence or a damp cove; test the sump and backup |
| Summer (storm season) | Watch the gutters in one hard rain; check splash blocks and extensions after mowing; confirm the sump discharge outlet is clear | Run the dehumidifier at 50 percent; do the foil test on any wall that feels damp; check the hygrometer in the far corner |
| Fall (before the leaves and the freeze) | Clean gutters after the leaves drop; put covers on window wells; regrade settled spots while the soil is workable; disconnect hoses | Test the sump pump and check the discharge for slope and freeze protection; replace the backup battery if it is in its fourth year |
| Winter | Keep downspout outlets clear of snow and ice; keep snow piles off the foundation; watch for ice dams that overflow gutters against the wall | Check the pit during thaws; note any seepage after a snowmelt, which is grade and window well water, not ground water |
Twenty minutes a season outside saves most of the work inside. The sump test is in our monthly test guide.
When to call a pro
Call a landscaper or a grading contractor when the lot needs more than a few wheelbarrows of soil, when a swale has to be cut to carry water around the house, or when a downspout line has to be buried to daylight across a yard. Call a basement waterproofer when water enters at the cove after the exterior is fixed, when a wall shows horizontal cracks, bowing or stair-step cracks in block (get a structural engineer's opinion first), when a block wall weeps across its face, or when a crack needs injection and you want it warrantied. Call a plumber for the sump, the backup and the discharge. If the basement is wet right now and the water has reached finished floors or walls, the first 24 to 48 hours decide whether it is a cleanup or a mold job; our 72-hour guide covers that, and the form below reaches vetted local waterproofers, plumbers and landscapers through HelpMeNow.com.
Frequently asked questions
What is the first thing to check if my basement is wet?
The downspouts. Go outside in a hard rain and watch where the roof water goes; a downspout that ends at the foundation or feeds a broken buried line puts hundreds of gallons against the wall in a single storm, and it is the most common cause of the seepage we saw. Then measure the grade (6 in. of fall in the first 10 ft) and look into the window wells. Fix those three before you pay for anything inside.
How far should downspouts extend from the foundation?
At least 6 ft, and 10 ft where the lot allows, discharging onto ground that slopes away from the house. A splash block alone moves water a foot or two, which is not enough on a flat lot. Hinged extensions fold up for mowing; a buried 4-in. solid pipe to daylight, a dry well or a storm drain (where allowed) is the permanent fix. Test any buried line with a hose; if it backs up, it is broken and doing more harm than no extension at all.
What slope should the ground have away from a house?
The building code (IRC R401.3) calls for the grade to fall at least 6 in. within the first 10 ft from the foundation, with swales or drains where lot lines or walls make that impossible, and paved surfaces within 10 ft sloped at least 2 percent away. Measure with a 10-ft board and a level. Add soil at the wall and feather it out, but keep the top of the foundation 6 in. above grade and soil 6 in. or more below any wood siding or trim.
Does waterproofing paint work on basement walls?
Within limits. Applied to bare, clean concrete or block, a masonry waterproofer resists moisture that migrates through the pores of the wall and is a reasonable finish once the outside is fixed. It will not hold over old paint or efflorescence, cannot bridge a moving crack, and does nothing for water entering at the floor-wall joint, which comes up under the slab. If it blisters off, the pressure behind the wall is telling you the real fix is drainage, not coating.
When do I need an interior drain tile system?
When the gutters, downspouts, grading and window wells are already right and the basement still takes water at the floor-wall joint in wet seasons, or when the water table is simply high. An interior system relieves the pressure that pushes ground water up at the cove by giving it a path to a sump. It is the wrong first move for walls that are wet at grade level under a downspout, and it does not keep a block wall from weeping above the membrane. Specify a cast iron pump, a sealed lid and a battery backup.
Interior or exterior basement waterproofing: which is better?
Exterior waterproofing stops water from entering the wall; interior drainage catches it after it arrives and pumps it out. Exterior is the better fix for block walls that weep across their face, walls with many cracks or structural movement, and any wall that will be excavated anyway, but it costs far more and destroys landscaping. Interior drainage is the practical answer for water at the cove in an otherwise sound wall. Both are pointless if roof and surface water have not been dealt with first.
The seasonal checklist, by email
One email when the season changes — freeze week, spring thaw, hurricane season — with the checklist for that month. No weekly newsletter, no selling your address.
We send one confirmation link first. Every email has a one-click unsubscribe. Privacy.
Check your inbox for the confirmation link; the checklist follows as soon as you click it.
You are on the list. The next email arrives when the season changes.
That did not go through. Check the address and try again.
DryHomeLab is written and reviewed by the team behind HelpMeNow.com, a marketplace that connects homeowners with vetted local contractors for water-damage restoration, plumbing and waterproofing. Before HelpMeNow the same team ran a 24/7 water-damage restoration company in the Seattle area; the equipment on this site is what we specified, bought and ran on real water losses. We publish the rubric behind every score.
- Ran a 24/7 water-damage restoration company, Seattle area
- Operate HelpMeNow.com, a contractor marketplace
- Publishes its scoring rubric